Showing posts with label Party Foods. Show all posts

August 26, 2018

Sorakkai/Bottle Gourd Halwa

How to make Sorakkai/Bottle Gourd Halwa

             
            This was the very first sweet that I ever made, probably in my late teens. I remember my great grandma watching me fumble my way through the steps of the recipe that I had written down possibly from a Tamil magazine or newspaper. What I liked about this recipe is that it uses the basic ingredients that would already be available in an average Tamil household in that time period & does not ask for mawa or food colors etc. Of course, if you like you can substitute evaporated milk, mawa or food colors as you like. I have tweaked the recipe by using the pressure cooker to speed up the process. Do try this easy recipe & enjoy.


Ingredients for about 4 servings

1 large sorakkai/bottle gourd- 5 cups grated/minced
3/4 cup sugar
1 cup evaporated milk/regular milk
1/4 tsp cardamom powder
A pinch of turmeric powder
A pinch of salt

For frying

1 tbsp ghee
A few cashewnuts


Stovetop method

  • Wash, peel, remove the seedy area & finely mince the bottle gourd in a chopper. You can also use a grater & grate the bottle gourd. Squeeze out the juice and set aside as we will not be using it in the recipe.

  • Heat a pressure pan on medium heat, add the minced/grated bottle gourd, a cup of milk & 3/4th of a cup of sugar. Stir, close, add the whistle & let cook on medium heat for three whistles. When done, let the steam out manually or naturally. Add turmeric powder, cardamom powder, salt & keep stirring occasionally until all the liquid evaporates. 

  • Meanwhile heat a tiny pan with ghee, fry the cashews until golden brown & add it to the halwa when most of the liquid has evaporated. 

  • Simmer for a few minutes until you get halwa consistency & serve warm or cold.

Sharing this simple yet delicious recipe with my fellow bloggers at SriValli's CCC #57 Aug Week 3.

March 4, 2018

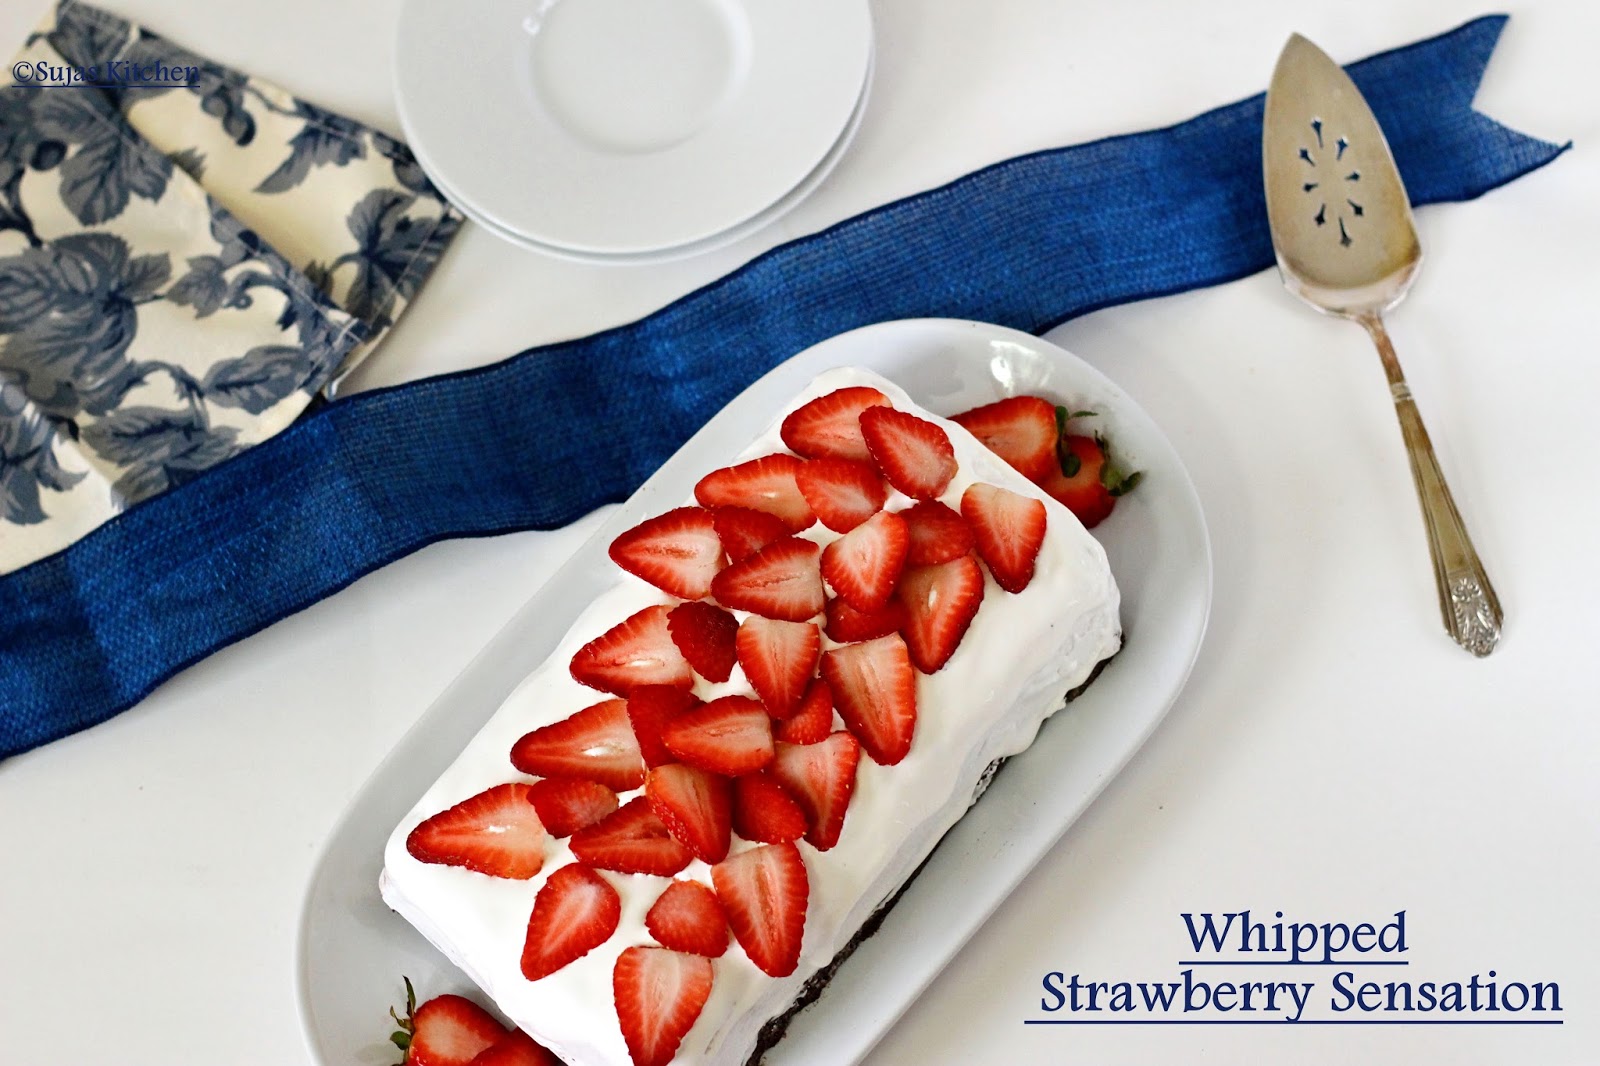
Whipped Strawberry Sensation

How to make Whipped Strawberry Sensation


               This recipe has been our family favorite and my son will ask for this frozen dessert every chance he gets, be it his birthday, dinner party or friends visiting from out of town. This is such a super easy recipe that your tweens/teens can make it on their own & surprise their family members. In fact, my son started off with assisting me in the kitchen just cos' he has a sweet tooth and I am now convinced that one day he will be able to cook for himself. 

               This recipe is from a magazine clipping that I had saved years ago. I also learned from a friend that this is also an old recipe and was made by whipping up heavy cream. By using Cool Whip, we can cut down on time spent in making the dessert. It is also a make-ahead dessert, to save you time. Sharing this quick & easy recipe with my fellow bloggers at CCC# 54: Mar Week 1.


Prep time: 20 mins
Freezing time: 6 hours
Servings: 12 slices

Ingredients:

4 cups fresh strawberries, divided
1 can (14oz) of sweetened condensed milk
1/4 cup lemon juice
1 tub (8 oz) COOL WHIP whipped topping, thawed, divided
8 to 10 OREO chocolate sandwich cookies, finely chopped/ground
3 tbsp butter, melted


Method:

  • Line 8x4 inch loaf pan with foil. 
  • Powder the OREO's using a food processor or chop/crush finely. Mix in the melted butter and set aside.

  • Mash or finely chop 2 cups of strawberries and add them to a large bowl. Stir in condensed milk, lemon juice and 2 cups of the COOL WHIP, pour into the foil-lined pan.

  • Top with combined chopped cookies & butter; press into the mixture and cover/wrap tightly.

  • Freeze at least 6 hours. To serve, invert onto a plate. Remove foil. Frost with remaining COOL WHIP. Top with remaining strawberries (sliced) and serve immediately. 

Notes/Tips:

  • Best served at once. If you need to refreeze, you can do so without the strawberries on top.
  • Can be made-ahead, except for the strawberry topping. 
  • Make sure it is stored in the freezer in an air-tight container, so it doesn't absorb other odors.

December 24, 2017

Sugar Cookies

How to bake Sugar Cookies


             Sugar cookies are very appealing to the eye as it is the perfect base for frosting, sprinkles and other sweet decorations. Kids go for it anytime like their other all-time favorite Chocolate Chip Cookies Sugar cookies can be made with a cookie press or may be rolled and cut into shapes moreover, it is fun to decorate with kids either with icing or sparkling sugar. I have only used colored sugar here, you can also do some icing & decorations on top like I did on my Lime shortbread trees. The point is to have fun with your baking, this holiday season. Happy Holidays!!


Makes about 130 small cookies
(I only made half the quantity)

Ingredients:

3 & 2/3rd cups unbleached, all-purpose flour
1 tsp baking soda
1tsp salt
1/2 tsp ground cinnamon
1 cup (2 sticks) unsalted butter, melted & cooled
1 cup granulated sugar
1/2 cup packed light brown sugar (I used white sugar)
2 tsp pure vanilla extract
3 large eggs
Decorating Sugars

Optional Gadget - Cookie Press
(can also be made without the cookie press)


Method:

  • Preheat oven to 350° F.
  • Put the flour, baking soda, salt, & cinnamon into a small mixing bowl, whisk to combine; set aside.

  • In a large mixing bowl, combine the butter & sugar. Using an electric beater, mix until light & fluffy. Mix in the vanilla & then the eggs, one at a time, until completely combined. Add the reserved dry ingredients & mix on low speed, until just combined.

  • At this point, you can divide the dough into two parts & add desired food color.

  • (OPTIONAL STEP) ONLY FOR COOKIE PRESS USERS - Assemble the cookie press with the desired disc. Load the cookie dough, just until the max fill line. Press cookie dough out onto a greased baking pan about 1 inch apart. You can add sparkling sugar sprinkles if you like at this point.

OR

  • FOR USERS NOT USING A COOKIE PRESS - Since the dough is made a little softer than usual, we need to dust it with some more flour to get the right consistency. Wrap in plastic & refrigerate for 3 hours. Lightly dust your work surface & roll out your dough about 1/4" thick & use your cookie cutters to cut out your favorite shapes. Lift the cut-out cookies using small spatulas or nylon spreaders and assemble on the baking sheet about 1" apart. You can add sparkling sugar sprinkles if you like at this point.

  • Bake in the preheated oven for about 10 minutes, or until lightly golden around the edges.

  • Cool cookies before removing from the pan & transfer to a wire rack to cool completely.

Important Notes:

  • For non-cookie press users - It is important that you dust it with some more flour to get the right manageable consistency. Wrap in plastic & refrigerate for a few hours before you work with the dough.


Sharing this recipe from my cookie press booklet with my fellow bloggers at SriValli's CCC #52 December Week 4.


December 10, 2017

All-Time Favorite Cookies

All-Time Favorite Cookies 


 Here is a quick look at some favorite cookie recipes, all in one place just for you.


November 26, 2017

(Fresh) Methi Chaman Pulao

How to make restaurant style Methi Paneer Pulao


                This is one of chef Venkatesh Bhat's recipe that was aired maybe last year. I was so tempted by this recipe, I tried it within a few days & was amazed that it truly tasted like a fine dining restaurant dish. It is definitely a party/pot lock recipe with its richness & aromatic flavors. If you want to cut down on ghee, you can do so & still enjoy this pulao with all its flavors. But, please do try it out as mentioned in this recipe at least the first time, before you make changes to it in order to enjoy its full flavor. Sharing this with my fellow bloggers at SriValli's CCC# 51: November Week 4. Do share your comments on how your family liked the pulao. 


Ingredients :

A) basmati rice (uncooked) - 1.5 cups
     methi / Fenugreek leaves (leaves only) 1 cup, tightly packed.
     onion 1 medium, sliced
     ghee - 2 tbsp + 2 tbsp
     oil - 2 tbsp
     saffron - 1 big pinch
     milk - 1/2 cup
     ginger-garlic paste - 2 tsp
     Salt to taste
     1 inch, ginger - julienned 
     fried onions - 2 tbsp

B )   To fry/saute in oil

      cloves - 4no:s
      cinnamon 1 whole
      cardamom pods - 4 no:s
      black cardamom - 2 no:s
      bay leaf 1
      black peppercorns - 8 or 10 no:s
      halved green chilies - 2 no:s

C )  For the Marinade: 

      Mix all the ingredients listed below & add the paneer as the final ingredient & fold gently. Let sit for at least 30 minutes.

      fresh curd/yogurt - 1/2 cup
      ginger-garlic paste - 1 tsp
      salt for the paneer
      green chilies 3
      turmeric powder - 1/4 tsp
      coriander/dhaniya powder - 1 tsp
      chili powder - 1/2 tsp
      dry roasted jeera powder - 1/2 tsp
      garam masala powder -1/2 tsp
      cubed paneer - 1 cup


Stovetop method:

  • Wash and cook the rice until it's almost cooked (3/4th done).
  • Wash thoroughly and chop the methi leaves (discard the stems). Before adding to the pan, squeeze the chopped methi leaves to remove some of its bitterness, if you desire.
  • In a large deep pan heat oil and add whole garam masalas ( listed under ingredient list B), fry until aromatic & lastly add green chilies. Saute for a minute and add sliced onions, let it turn translucent add ginger garlic paste and, julienned ginger. Let saute until the raw smell is gone and then add the chopped methi leaves & saute until the leaves are cooked.
  • Now add the marinated paneer ( listed under ingredient list C ) add salt & 2 tbsp of ghee, stir gently & cook for a few minutes until the raw smell of the marinade disappears.
  • Pour warm milk into a cup & add the saffron & give it a stir.
  • Layer the cooked rice on top of the paneer-methi mixture, drizzle 2 tbsp of ghee & sprinkle the saffron-milk mixture on top of the rice. 
  • Cover the pan with a lid. Place the covered pan on top of a tava/griddle & cook on medium heat until rice is completely cooked. Top with fried onions & then turn down the heat to the lowest setting for 'dum' cooking for a few more minutes & turn off the heat when the rice grains are fluffy & separate.

October 29, 2017

Devilish Delights (Cookies)

How to bake Devilish Delights (Cookies)


          The first time I set my eyes on these scrumptious cookies, (in a betty crocker cookbook) I knew it was a trap. I couldn't, not bake these insanely chocolatey cookies. I hope I have done justice to these cookies with my amateur photography skills and brought out the real texture of these beauties. These chocolatey devilish delights get their kick from freshly brewed coffee. Sharing this recipe with my fellow bloggers at SriValli's CCC#50 Oct Week #4


MAKES: ABOUT 36 COOKIES
BAKE: 8 MINS at 350°F

Ingredients

6 tablespoons all-purpose flour
1/2 teaspoon baking powder
1/8 teaspoon salt
2 eggs
1/2 cup sugar
1-2 tablespoons coffee liqueur or strong brewed espresso
2 teaspoons vanilla
10 ounces espresso-flavor chocolate baking bar or bittersweet chocolate bar, chopped
2 tablespoons butter
12 ounces dark chocolate baking bar, chopped


Directions:

  • Preheat oven to 350 degrees F. Lightly grease a cookie sheet or line sheet with parchment paper; set aside. In a small bowl, combine flour, baking powder, and salt; set aside. In a large bowl, combine eggs, sugar, coffee liqueur, and vanilla. Beat with an electric mixer on medium speed until combined; set aside.
  • In a heavy medium saucepan, heat chopped espresso chocolate and butter over medium-low heat until melted and smooth, stirring occasionally. Remove saucepan from heat. Whisk melted chocolate mixture into egg mixture until combined. Stir in flour mixture until just combined. Stir in the chopped dark chocolate baking bar.
  • Drop dough by heaping teaspoonfuls onto prepared cookie sheet. Bake in the preheated oven for 7 to 8 minutes or until tops appear dry and centers remain soft. Cool on cookie sheet for 3 minutes. Transfer cookies to a wire rack; let cool. Makes about 36 cookies.

Storage:

  • Layer cookies between sheets of waxed paper in an airtight container; cover. Store at room temperature up to 3 days or freeze for up to 3 months.

Notes:

  • I used strong brewed coffee instead of chocolate liqueur and used bitter-sweet chocolate bar instead of dark chocolate in the recipe.
Sharing this recipe with my fellow bloggers at SriValli's CCC#50 Oct Week #4.

October 15, 2017

Coconut Meeta/Sweet Paan Ladoo

How to make Coconut Meeta Paan Ladoo

    
      From using it in religious ceremonies to eating it in the form of a 'paan'; betel leaves contain many curative and healing health benefits. My mom & grandma used to grow it in our home and these aromatic leaves were readily available to reap the health benefits from the same. Betel leaves are supposed to heal wounds when applied over a wound and bandaged. If you are suffering from a severe headache, my grandma used to ask us to use 'vetrilai pathu' The leaves have cooling properties which provide instant relief from the ache when applied externally.

         Benefits aside, I have always been a fan of the meeta paan for the sweet filling in it.  So, here is a recipe that skips the slaked lime (sunnambu) & areca nuts/supari (pakku), but has all the yummy ingredients like coconut, elaichi, gulkund, nuts & cloves. You can pick & choose your favorite filler ingredients.


Coconut Meeta/Sweet Paan Ladoo


Ingredients for about 30 ladoos:

2 cups fresh/frozen grated coconut (do not use the brown part)
8 to 10 vetrilai/paan/betel leaves
1 cup condensed milk
about 1/2 cup, dry desiccated coconut (for rolling)
1/2 tsp, cardamom/elaichi powder
1/2 to 3/4 cup of gulkund (rose petal preserve)
1/2 tsp, saunf/fennel seeds
whole cloves, for garnishing
green food color, optional
chopped nuts, optional (I used almonds)


Method:

  • To a food processor, add the grated coconut & grind dry until fine. Transfer to a bowl. 
  • Wash, remove the stem & the bottommost tip of all paan leaves. Add tore paan leaves, pulse until fine add condensed milk & grind till both are well combined. Add few drops of green food color, if desired. 

  • Heat a pan on medium heat, add the coconut and roast for a couple of minutes on medium-low heat. Add the condensed milk - paan mixture and stir to combine. You can add the elaichi powder & fennel seeds at this point.
  • Cook for a few minutes on low heat, until the mixture, thickens & forms into one solid mass. Remove from heat and let the mixture cool down a bit.

  • Grease your hands with ghee if needed, take a small portion from the coconut mixture, flatten it and add ½-1 teaspoon of gulkund and chopped nuts in the center. Bring the edges together and roll to form a ladoo. Roll the prepared ladoos in desiccated coconut. Repeat the same process with the remaining ladoos.

  • Garnish with cloves, if desired. Refrigerate the ladoos & enjoy as a digestive/mouth freshener.

This recipe was inspired by another paan recipe from a tv show. You may add supari to the filling if you desire. Sharing this delicious recipe with my friends at SriValli's  CCC#50 Oct week 3.

May 14, 2017

Baked Apple Roses

How to make Apple Roses


        "Mothers are like buttons, they hold everything together."

      That reminds me of my mother who holds all the family members together. She was always the one, who knew what was going on with everyone in the family. Especially when all of us (my brothers & I) moved out of the house. We may not be in frequent touch with each other; but we would be in constant touch with Amma, so she always had the latest updates. Some of us are too busy to listen to others and then some of us are too busy to share things about our life. Mothers always have the time to listen to her children and read between the lines too. 


      Motherhood teaches us a ton of things and humbles us. I only wish someone had prepared me for what to expect, and how to handle the 'n' number of situations that arise in parenting. I guess that is what makes every mother unique. But hey, I feel better reading the following quote :)

"Good Moms Have Sticky Floors, Messy Kitchens, Laundry Piles & Happy Kids."

Happy Mother's Day, to all the Mom's & all the Dad's who take on the role of a mother!


Ingredients for 6 to 8 roses:

1 sheet of Pepperidge farm frozen pastry, thawed
2 large apples, cored & sliced
1.5 Tbsp lemon juice concentrate or juice from 1/2 a lemon
2 cups of water or more as needed
cinnamon powder, to sprinkle
fig preserves - 3 tbsp
1 Tbsp, water

Special equipment needed:
Muffin pan - greased or lined


Method:

  • Preheat oven to 375° F. (Please read notes below)
  • Wash, cut in half, core & slice the apples into very thin slices. 
  • In a microwave safe bowl, add the water, lemon juice and sliced apples & microwave for 3 minutes. Drain & let sit. 
  • In another bowl, add the preserve & 1 tbsp of water and microwave for a minute; stir & set aside.
  • On a floured surface, unwrap & place the thawed pastry sheet, dust with flour, using a rolling pin, stretch it out as needed to make 6 to 8 strips that are 1.5" wide.
  • On every strip, smear some preserve, place the apple slices on the top half of the strip, sprinkle with apple spice mix and fold over the bottom half of the pastry strip and roll tightly to form the roses. 

  • Place the roses into the prepped muffin pan & bake for 35 to 40 minutes. Remove & let cool.
  • Dust with confectioners sugar & serve on a platter. 


Notes:

  • My roses were only mildly sweet because the only added sweeteners were the fruit preserve & the confectioner's sugar on top. If you like more sweetness, try adding a 1/8th tsp of brown sugar into the center of every rose, after they have been rolled up & ready to go in the oven.
  • Any fruit preserve can be used, or you can even skip it.
  • Try adding cinnamon sugar instead of plain cinnamon, prior to rolling the roses.
  • Can also be served with a drizzle of caramel sauce on top.
  • If you are baking on a cookie sheet, make sure you press the pastry sheet with wet fingers at the end of the roll, to make sure, it doesn't open up during baking.

February 26, 2017

Old fashioned Banana Cream Pie

How to make an old fashioned banana cream pie


          This year, for my son's b'day; we decided to have home-made banana cream pie, instead of the usual birthday cake. It's not that weird, considering the fact that he has been asking us to pick up a banana cream pie every time we hit the grocery store for the last couple of months. So I figured, why not? Whatever makes him happy, is good enough for his birthday. This recipe is from my recipe dairy, probably noted down from a food network show. Top it with whipped cream or go all the way & drizzle some caramel sauce, and top it with shaved chocolate just for good measure.

         I made the pie crust from scratch with this recipe - Buttery & flaky pie crust and for my li'l one, who is a devoted chocolate lover I made some delicious Chocolate Brownies. If you ask him, there cannot be a celebration without something chocolatey :)


Ingredients for 8 to 10 servings:


3⁄4 cup sugar
1⁄3 cup all-purpose flour or 3 tbsp of corn starch
1⁄4 tsp salt
2 cups milk
3 egg yolks, lightly beaten
2 tablespoons butter or margarine
1 teaspoon vanilla extract
3 medium firm & ripe bananas, sliced
1 (9 inch) pie shell, baked
Sweetened whipped cream or Cool Whip

Optional Toppings:

Caramel/Chocolate sauce
Chocolate shavings
Sliced bananas or berries

Method:

  • Preheat the oven to 350°F.
  • In a saucepan, combine sugar, flour/corn starch, and salt; stir in milk and mix well. Cook over medium heat, stirring constantly until the mixture thickens and comes to a boil; then boil some more for 2 to 4 extra minutes until thickened.
  •  Remove from the heat. Stir a small amount of cream mixture into egg yolks for tempering and pour the egg yolks slowly into the saucepan. 

  • Cook for 2 more minutes, stirring constantly and remove from heat. Add butter and vanilla; mix well; allow to cool slightly. 
  • Place the sliced bananas evenly in pastry shell and pour cream/custard mixture over the bananas. 
  • Bake the pie for about 12 to 15 minutes. Cool to room temperature on a wire rack. 
  • Let it chill in the refrigerator for at least an hour or two, before topping with whipped cream & serving in slices.
  • Cover loosely with foil/plastic wrap & use within 3-4 days under refrigeration.
Sharing this recipe with my friends at SriValli's CCC# 41: February -- Week 4.

January 1, 2017

Twisty Pesto Cheese Straws


How to make Twisty Pesto Cheese Straws


            Here's a quick & scrumptious recipe for your next party. I am glad I took the time to finally make these crispy, flaky, cheesy hors d'oeuvres from a Good Food magazine clipping (Dec 2013). I would love to customize this to the Indian palate, by adding a spicy alternative to pesto, next time. You can also easily turn this into something sweet for the young ones. The best part of it, is that its crisp on the outside, yet so soft when you bite into it. Kids just love these. Sharing this final recipe of the year, with my friends over at CCC# 39: December -- Week 5


Ingredients:


(makes around 25 pcs)
5-6 oz, cream cheese
2 tbsp basil pesto sauce
1 lb/490g sheet puff pastry (2 sheets of frozen pastry sheets)
a little flour, for dusting
1 egg, beaten


  • Heat oven to 400°F. Tip the cream cheese and pesto into a bowl and mix well.
  • Unroll the pastry on a lightly floured surface and cut in half lengthways. Spread the pesto mix over one half, place the other piece of pastry on top to create a sandwich, then cut in half lengthways to create 2 long rectangles. Divide each rectangle into short strips, about 1cm thick. Twist each pastry strip and place on a baking tray lined with parchment.
  • Brush with egg and bake for 20 mins until risen and golden brown.


Related Posts Plugin for WordPress, Blogger...